Manuel
-
Număr conținut
750 -
Înregistrat
-
Ultima Vizită
Tip conținut
Profiluri
Forumuri
Calendar
Orice postat de Manuel
-
Lipire toba de crom virago 535
topic a răspuns lui Manuel în adovis77ul Service si intretinere curenta
ce ai tu nu e cromat ...e nichelat. oricit s-ar chinui cineva sa iti lipeasca(de fapt sudeze) "chestiile" tale iti v-a afecta nichelu'. -
toti acesti cilindri de 47 mm(72cc)si 52 mm(90cc) sunt inscriptionati cu 49cc din fabrica.(POLICE VERSION) ex luat la intimplare dar pot fi si exceptii: http://www.monkeybike.co.uk/acatalog/72cc_Alloy_Cylinder___47mm.html http://www.daxanized.com/tuningstore/product_info.php?products_id=335
-
Cu plĂĆcere!...ba chiar plĂĆcerea a fost mai mare vazĂÂŽnd ĂÂŽnca un "nebun"(pentru unii)interesat sa se "joace" ĂÂŽntr-un mic motoraĂŸ,sĂĆ inveĂÂŁe ceva practic..ĂŸi lovindu-mĂĆ de aceleaĂŸi am simĂÂŁit nevoia sĂĆ ajut...sheruiesc(flit ACTA). Succes.
-
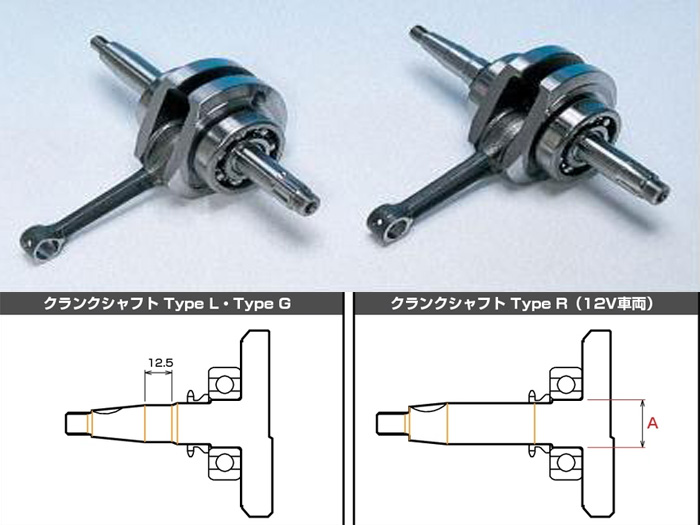
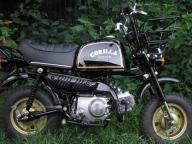
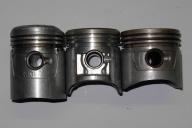
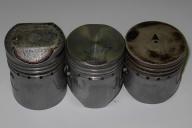
sal! eu am o Honda Z50j Gorilla ...motorul tau de la Sachs este o copie dupa tipul asta de motor de la Honda...unele piese sunt interschimbabile daca nu chiar toate. daca ai pistonul de 39 mm atunci cursa sigur e de 41,4mm pt o cilindree de 49. daca vrei sa o faci de 107cc neaparat trebuie schimbat ambielajul cu unul cu cursa lunga(stroker)(toate chinezestile sunt cu cursa lunga)...dar fii atent si aici ca unele sunt cu biela scurta si unele cu biela lunga..unele cu bolt(piston) de 13mm unele14mm unele15mm...in functie de ce motor a fost copiat cel pe 6v sau cel pe 12v.uite diferenta pistoane: uite si diferente intre ambielaje: daca nu il schimbi (ambielajul)masoara intai diametrul carterului unde intra cilindrul sa stii exact ce cilindru poti potrivi. la motoarele de 49 diametrul era cam 54mm si poti gasi cilindru(nu in Romania)de/cu 52mm diametru si piston pentru el si il ridici la maximul care poti fara sa schimbi ambielajul(calculam cc:Hxpi(3,14)xraza la patrat....41,4x3,14x676=87,877...aproape 90cc) deocamdata em am pus un cilindru de 47mm...72cc.si o aprindere mai deosebita,de la Daytona, ca originala era pe platina ...uite exemplu: http://www.minimotoracing.fi/index.php?main_page=product_info&cPath=8_30&products_id=204 ...am pierdut cuplu la turatii mici in schimb e o placere in turatii medii si mari plus ce e super sprinten motorasul . mai cauta aici pt piese: www.daxanized.com sunt nemti si la englezi: http://www.monkeybike.co.uk/acatalog/index.html succes.

-
Cu placere...
-
probleme Kawa GPZ 500s
topic a răspuns lui Manuel în ..:::ZAR:::...ul Service si intretinere curenta
tocmai am rezolvat exact aceeasi problema....s-a dovedit a fi aprinderea... -
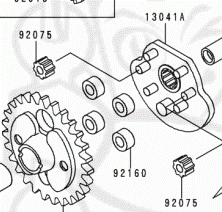
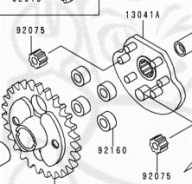
e...daca e ce cred eu este usor si simplu de schimbat...am mai schimbat la mai multe vn-uri cu aceleasi simptome... e vorba de niste bucse mici de cauciuc...daca ai cartea de service este la pagina 13 din capitolul 8... (8-13). trebuieste desfacut capacul la alternator/generator(etc),depresata volanta ...nu trebuieste o presa prea sofisticata e vorba de in simplu surub dar din pacate nu mai stiu cotele(grosime,pas filet).cum ar veni sub volanta dar putin mai in fata e balansierul sting care este actionat prin bucsile alea mici de cauciuc care cu timpul se coc si se turtesc sub cota facind ca un semi ax sa loveasca usor un pinion cauzind zgomotul...daca nu te deranjeaza mai poti mere asa dar daca se accentueaza rau e mai bine sa le schimbi......ete vorba de pesele cu codurile: 92160(4buc)..6,5 eur toate 4 si 92075(2 buc) 7,5 eur amindoua. Mesaj completat nu a mai mers sa reeditez... daca te uiti atent la balansier are 6 semiaxe pe care vin cauciucurili si un ax mai grosutz care pur si simplu vine in mijlocul unei gauri din pinionul ce actioneaza balansierul...ee,uzura cauciucurilor e asa de mare incit semiaxul ala mai grus bate in pinion....nu stiu daca ai inteles da io am transpirat la batut in tastatura... succes.
-
se aude si cind pleci de pe loc putin subturat...mai rar..clonc.clonc dar infundat?
-
4t e mai usor controlabil....dar eu unu nu vreau pt cross ca la o revizie iti pui miinile in cap cite iti trebuie in plus fatza de 2T. se zice ca un 4T e ca un tampon ...toate pi....da sa zic in limba lor...every pussy uses it!
-
nu ma la dyno....la aia de le rup pe coclau ,nici nu maintereseaza dyno pi mini ca de ex o motoreta de 100 kile si 60 de cai o sa fie muult mai infipta si distractiva ca una de 200 de kile si100 de cai....lasa tu teoria si vezi practica.
-
io am Rm 250 ...ca sa fie clar de la inceput... per total (finetea cutiei de viteze,amortizoare,felul cum trage,cum da puterea pe toata plaja de turatii,etc) YZ 250 e cel mai tare...trage incepind imediat de relentiu..depinde si ce vrai tu de la motoreta...CR-u sare cel mai repede in ture,rupe aderenta prea mult,cuplul(nu prea se poate zice de cuplu la 2T dar sa zicem asa) RM-ului e intinsa aproape pe toata plaja de turatii...adica la aparitia unu obstacol imediat in fata la simpla deschidere a gazului YZ -u te arunca peste elegant pe cind CR-u daca nu esti f atent cu gazu in loc sa te impinga el patineaza...RM a fost din totdeauna cel mai manevrabil in curbe,derapaje,padure,portiuni tehnice.SX-u ,nu am mers cu unu,se zice ca fata de japonezi e mai bun doar la frine si atit...cauta pe saituri americane teste facute de ei pt ca teste facute ca ei nimeni nu mai face.nu tine nici cu unu nici cu altu. cel mai bine sa mergi pe fiecare in parte si te convingi singur ce iti trebuie.
-
Cred ca asa se face..Dai shaua jos,desfaci surubul de sustinere a rezervorului ,ala din fata de linga jug,ridici de el(rezervor) usor in sus pt ca in partea din spate rezervorul e pe balama si o sa se vada bujia infipta in partea cea mai de sus a motorului...cheie de 21 iti tre'...
-
...'nu are atîtea suruburi'...sa intelegem ca nu are atitea suruburi de reglaj?'n' clicuri pe compresie, 'n' clicuri pe revenire...dar sigur in cartea de reparatii zice cum sa jonglezi cu uleiul. ...poi atunci se pot seta si din cantitatea de ulei si din viscozitatea uleiului. asta implica mult timp si bani.
-
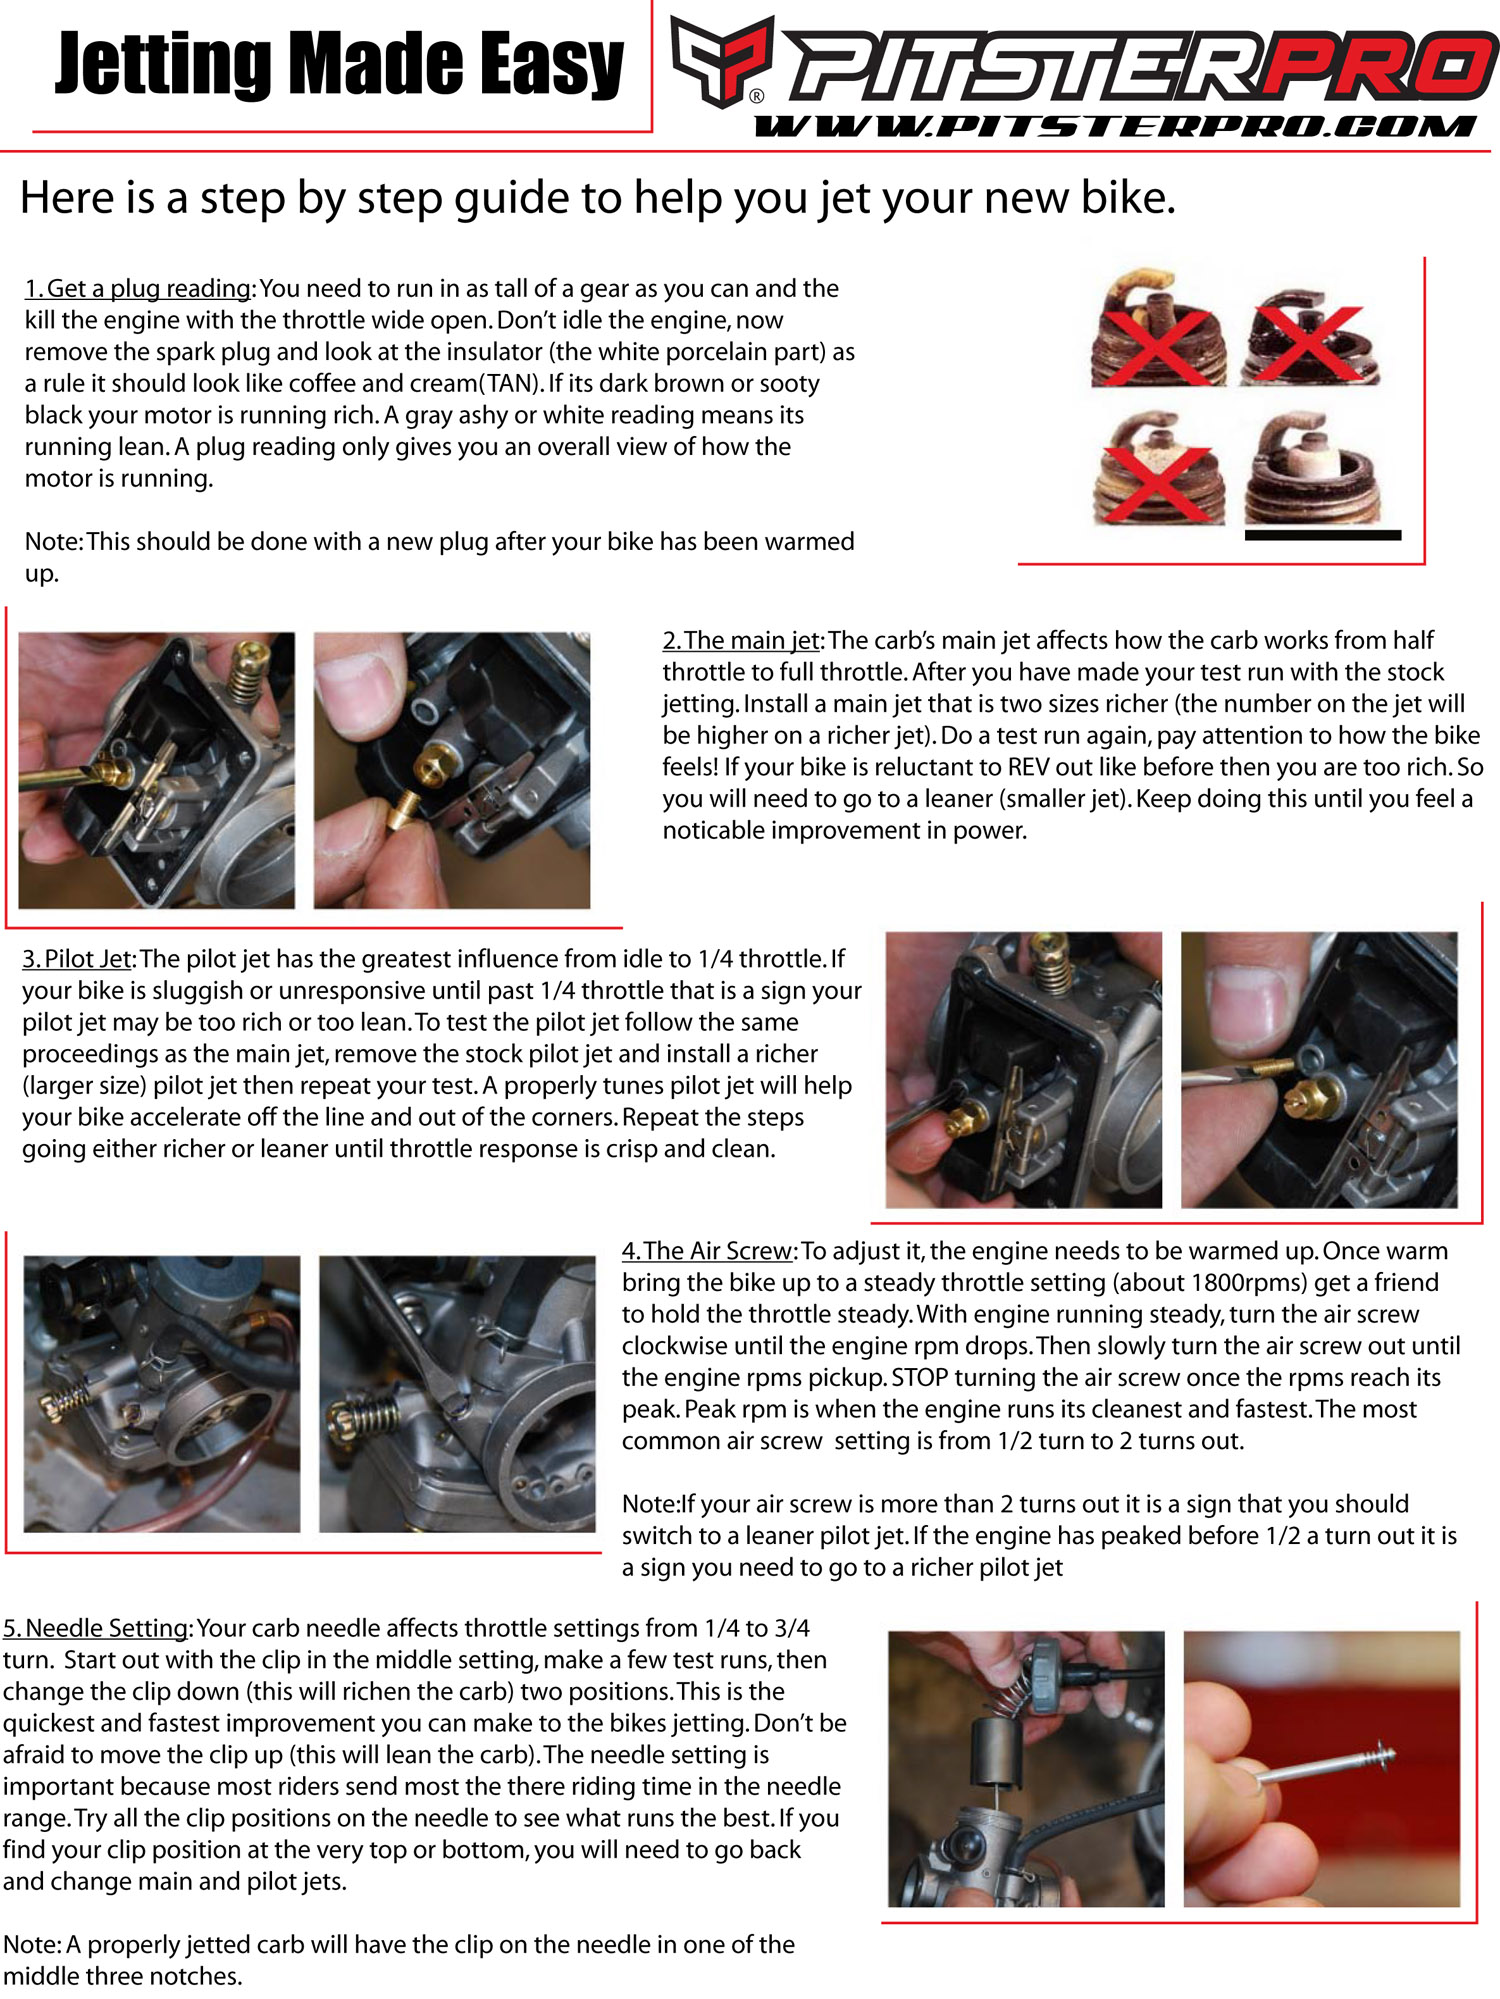
maro deschis pt un motor in 2T zic mecanicii amestec putin sarac... citirea bujiei se face ,dupa ce ai adus motorul la temp de lucru,in felul urmator:cauti un loc unde poti intinde bine toate vitezele iar in ultima treapta sa poti mere cel putin 15-20 secunde la maxim(accelerat la maxim)moment dupa care tii apasat butonul de oprire moto si tragi ambreiajul in acelasi timp fara sa lasi motorul la relantiu deloc dupa care scoti bujia...acum iti zice daca jiglerul principal e bine ales. asta e cel mai simplu in setarea unui carburator. in pasul urmator e important sa insemnezi pe acceleratie pozitia ei sa stii exact cit de mult e deschisa acceleratia ...un sfert(1/4),jumatate de sfert.. (1/8),jumatate(1/2),etc.. eee,acum mergi in treapta a3-a cu acceleratia deschisa intre 1/8 si 1/4 mai multi km...daca incepe sa se inece,sau e neagra bujia, e mare jigleru de mers in gol,relantiu(asta are efect asupra amestecului carburant pina aprox 1/4 din acceleratie) daca jigleru e bine ales atunci cind esti la 1/8 din acceleratie in treapta a3-a si tragi instant de gaz instant tre sa iti vina coarnele in fata... daca ai ureche la reglat aerul la mers in gol la 2T iti va zice surubul de aer daca si jiglerul de relantiu e prea mare sau prea mic...plaja de reglaj tre sa fie undeva intre 0,5-2,5 ture..acest reglaj este usor influentabil de presiunea atm si umezeala din aer. daca in ambele regimuri culoarea bujiei este maron inchis atunci sigur iti va mere bine mororul in toate regimurile... cauta pe net ca e destul de citit numa sa stii bine engleza.
-
cum arata bujia?ea iti zice exact ce tre sa reglezi ...poate urmatoarele te ajuta.. asta pt mikuni: http://www.mikuni.com/pdf/vmmanual.pdf

-
120/90-17: http://heidenau.ro/index.php?page=shop.pro...rt&Itemid=5 si mai cauta acolo ca are si 130/80-17.
-
cu tot respectul,vorbesti din carti !...stress_L&P vorbeste din experienta.. degeaba copy/paste la noi ca noi (unii foarte putini de aici) le stim/simtim din experienta. spor.
-
dinaia de vibreaza la viteza nu destul de mare... (pt aia cu hayabusa..). nu rasp la pm?
-
io cred ca e doar problema de jetare a carburatorului,ce i sa intimpla strainezii ii zic fouling plug. cauta pe goagle cum se regleaza/jeteaza un carb de 2 timpi si o faci singur...de obicei ,din fabrica, crosurile in 2T vin setate ca bogat de frica sa nu fie calate...acum depinde si de stilul de mers al fiecaruia..daca mergi mai in ture,pe circuit,mai mult cimp nu se strica bujia ...daca bagi prin padure,carari,etc,ture mici atunci se vede daca e setat bine mai ales PILOT jetu'. asa mi-am jetat io Rm-u 250 dupe ce ce l-am luat ... uite exemplu...doua: Carb Jetting and Adjustment I can't stress how important it is to use GENUINE MIKUNI or KEIHIN jets in your carb. Aftermarket jets just aren't manufactured to the same tolerances and can vary quite a bit from OEM specs. The Mikini or Keihin jets may cost a few cents more, but the phrase "You get what you pay for" really does have truth behind it. A couple extra bucks here is a great way to keep from destroying an engine. You can find diagrams, part numbers and a lot of information on the majority of Mikuni and Keihin carbs on Sudco's web site. The entire idea of a carburator is to meter fuel at a certain percentage to the amount of air drawn in by the engine at all rev ranges from idle to wide open. Most carb have three major circuits (some have more, some have less) to cover the tuning range: An Idle Circuit. A Mid-range Circut A Wide Open Circut These circuts overlap each other just a bit, so the transition between them is smooth and unnoticed. Things such as atmospheric pressure, humidity, altitude and temperature all have effects on the tuning of a carb. The more modified an engine is, often - but not always the case - the more sensitive it may be to jetting. You'll find out by tinkering with your individual setup. One very valuable tool I've used for a long time is an Air Density Gauge. It lets you have a visual idea of just how much air is available for the given surroundings. An example would be when I race in Mexico, (sea level, usually 95+ degrees F) my gauge reads from 100 to 110%, but up in Snowflake (6,000 feet elevation, 75-80 degrees F) the gauge will read 65 - 70% I drop three main jet sizes. Eventually you'll be able to look at the gauge and interpret the jet size needed by the air density reading. Start keeping a log of your tuning. WRITE IT DOWN in your manual, or a notebook or some place that you'll be able to go back and find. (I write my information on top of the carb caps with a permanent marker as well as in a note book) Write down the following stuff: Main Jet Size What position the clip on the Needle is in (top groove is #1, bottom groove is #5) Make note of the Air Screw setting too. To do this, screw in your Air Screw until is just quits moving while counting the number of turns it takes to close it. DO NOT TRY TO TIGHTEN IT, just turn it in until it stops and count the number of turns. Do this SLOWLY and pay attention. Keep track in 1/8 increments. Write this number of turns down too. Most of the time this is somewhere between 1-1/2 to 2-1/4 turns. There's also a jet called a Pilot Jet. It helps with idle and just off idle tuning. You have to take the four phillips head screws out of the bottom of the carb and pull off the float bowl to find it. (To remove the float bowl, make sure you use a screwdriver that fits into the heads of the screws snugly - they call them butter bolts because they'll strip just like they were made of butter - pain in the ass). The Pilot Jet will have a number on it too. Anywhere from 20 to 60, depending on the carb and application. It is very important that you write stuff down. It gives you a base line to always go back to if you need to. Since a large part of the carb tuning involves the Main Jet, let's start with the basics and learn how to change a Main Jet. It's very easy to do. You need a 17mm wrench and a 6mm socket wrench or a screw driver with bits that you can change. Even better is get a Jet Wrench Kit - Dennis Kirk sells a nice one that comes with a small case that will hold a number of jets. The wrench will fit all Mikuni and Keihin hex jets - which are the most popular. Loosen the clamps that hold the carb in intake and air track boots. Rotate the carb so you can see the large nut on the bottom of the float bowl.* Use the 17mm wrench to remove the nut (right tight, left loose) and under this nut, you'll see the Main Jet. Take the bit out of the screwdriver, slip the screw driver over the jet and unscrew it (counter clockwise). You now have the Main Jet out. Easy, huh? When you put it back in DO NOT overtighten it. Just snug it - no macho man crap, just snug. A jet's just a small brass piece with a hole through it, so it's very easy to twist the threads right of the body of the jet, which leads to a bad day in the shop (and is usually accompanied by a good amount of swearing). Some Mikuni carbs (most of the TMX line) have a small brass washer that the Main Jet fits into. It often comes out with the Main Jet - MAKE SURE YOU DO NOT LOOSE THIS WASHER!!! It is extremely important and if you don't put it back in, the jetting will NEVER be correct. You'll chase your tail for hours and get nothing. On the side or on the bottom of the Main Jet you'll find a very small number inscribed in it. This is the jet size. The larger the number, the larger the jet. The more fuel it will flow and the richer the carb will be. Okay, let's get down to the tuning aspect of your carb. You'll want to do this each time you replace a part - especially if you put on a new performance part. (new air filter, air filter setup, pipe, etc.) You should have a little section in the book now that says something like the following: September 28, 2002 Main Jet - 150 Needle - #3 groove Pilot Jet - #35 Air Screw - 1-3/4 out Plug - BR8ES Let's start with the Main Jet: The Main Jet only works on the upper end of the throttle - approximately 3/4ths to wide open. Make sure you have a new spark plug installed. Take your ride out and get it warmed up. Run it full throttle, get it going as fast as it will go for a block or two and then hit the kill switch, close the throttle, put it in neutral and roll to a stop. Pull out the plug. What does your spark plug look like after a wide open throttle (WFO) run? What color is the electrode? (the part that has the little tit sticking out of it under the little bar) Is it black? If so, then it's rich. Drop the Main Jet size ONE Is it white? Then it's lean. Raise the Main Jet size ONE It should be about the color of a pancake or waffle. For now, change Main Jet sizes in ONE STEP increments. (one size is not 150 to 151, it will jump say to a 152 or 153 - same the other way - prolly a 147 or something near that) GO BACK AND RECORD YOUR NEW MAIN JET NUMBER Go do a plug chop again. What does it look like now? If it's still white, then you're still lean, if it's still black or dark, then it's still rich. Change the Main Jet accordingly and go do the plug chop again. Keep it up until you end up with a nice brown plug. Generally speaking, you should be able to use the same spark plug for these runs. If the plug came out black and gooey, you're extremely rich and may have to use a new plug for good readings. Lean out the Main Jet a size or two to get close on the jetting and then put a new plug in and finish out the plug chop runs. Use your best judgment. ------------------ Now, let's go look at the bottom end of the carb tuning. In general, a TWO stroke carb has an Air Screw adjustment - which will be on the AIR FILTER SIDE of the carb's slide. Most of the time, the air screw is set about 1-1/2 turns out from fully seated - this is a good base line starting point. At first, adjust the Air Screw in 1/2 turn increments so you can see the difference. Then start being more finite by making 1/4 turn adjustments. You'll eventually get to where you only need to make adjustments in 1/8 turn increments. Get your ride idling in neutral (warm it up fully first) Quickly nail the throttle, going from idle to wide open in a smooth manner, but quick manner. Just stabbing the throttle as fast as you can may cause enough disruption in the flow of the intake that the engine can't keep up - eventually, when the carb's tuned correctly, you should be able to nail it and have the engine react correctly. You'll see how this works as you tune the carb. What does the engine do? Does it hesitate and then rev up? As it comes back down to idle, does it seem to hang at a higher idle for a minute and then settle down to normal idle? If it does this you're Too Lean on the Air Screw adjusment. You need to richen it up by turning the Air Screw IN 1/2 turn and then repeat the test. Adjust as necessary, repeating the test until you have a nice response. Or Does it sound like it bogs a bit? As it comes back down to idle, does it seem to drop to a low idle (or even die) and then come back to normal? If it does this, it's Too Rich. Turn the Air Screw out 1/2 turn. Adjust as necessary, repeating the test until you have a nice response. Remember: Adjust the Air Screw in 1/2 turn increments at first then fine tune with 1/4 turn and then 1/8 turn increments. Repeat the proper adjustment until it responds without hesitation and drops back to idle without hanging or falling and then coming back up. Expect to do the bottom end adjustment at least three or four times before you get it right. Go write down your findings Now that you have a base line setting, try adjusting the air screw a full turn either way and see how the engine reacts. You'll soon see what the air screw does. Since you WROTE DOWN what you found, you'll be able to go right back to that adjustment point. Just a little FYI: Four stroke carbs have a small adjustment screw on the ENGINE side of the carb's slide - it's not an air screw, it's a fuel metering screw, so screwing in the adjustment leans the circuit. NOT what we want on our two strokes. Mid Range Tuning - The Needle Now that we've done the top end and low end adjusting, what was the overall tuning direction of what you did? Did you end up Leaning out the upper end and the bottom end? If so, chances are very good that it's Rich in the mid range too. (and vice versa if you were lean everywhere) If you Leaned out on top and Richened on bottom (or richened on top and leaned out on bottom), chances are that you won't need to play with the Needle's settings. This is where the Needle comes into jetting. The Needle is inside the slide. You have to remove the cap that the throttle cable comes into. It just unscrews, pull it out and a large spring and a slide with the Needle will come out. The Needle is removed by pulling the spring out of the slide body. You should be able to see it now. T here might be a retaining clip or washer on top of it. (once again, this depends on the carb - go use that manual!) Now, this is a point that confuses people a lot. To lean out a Needle, you need to move the Needle DOWN into the emulsion tube. You do this by moving the little c-clip Needle UP. You richen the Needle by moving it UP - done by moving the clip DOWN. You'll hear people talking lowering the Needle by raising the clip (leaning) or raising the Needle by lowering the clip (richen). You just have to stop and think about what was said. Get the vehicle rolling, about 1/4 throttle and then feed in the throttle (you want to take about 1-2 seconds feeding in throttle - quickly, but not just snap it open) What does it do? Does it come off the bottom end well and then seem like it gets sluggish? Then you're too rich - drop the Needle by raising the clip ONE position. Does it seem like it wants to pull through, but just doesn't have any go? Then it's lean. Raise the Needle by lowering the clip ONE position. GO WRITE DOWN WHERE YOUR CLIP IS!!! ------------------------------------ Depending on how out of range your jetting is, you may have to work with the needle, air screw and main jet a couple times to get it right. Don't be discouraged if it doesn't work the first time - learn from it instead. Worn Out Parts in your carb? A little background first: This issue is more prevalent in four stroke machines. It occurs more quickly on them as they have a higher suction pressure than a two smoke does on the intake stroke - but enough cycles on any carb can eventually cause this. (just a little side note: Most higher performance four strokes (MX Bikes and quite a few street bikes) use some version of the Keihin FCR flat slide carb. Because of the intake pulse's suction power, these carb's slides actually runs on bearings to keep them from getting stuck in the carb body during the intake pulse. That would be very bad! - it's also why so many of the four strokers use a push/pull throttle cable assembly - so you can force the slide closed if something inside the carb's slide sticks or such) Anyhow, back to the info... The needle, as it sits in the slide of any carb, is slightly loose - just the way they are by design. Some needles are held in by a small spring, some by a clip, some held by a small arm and a screw. But all of them have the ability to move just slightly. This movement (especially as the carb gets older and starts to wear) allows the needle to rub against the inner wall of the needle jet (the brass tube that the needle slides down into and that the main jet screws into from the bottom of the carb - sometimes called the emulsion tube). What happens over time is that the needle will eventually cause the needle jet to oval out, changing the jetting from mid-range on up towards the top end (not as much on top end though, as the main jet limits the maximum amount that the carb will flow when wide open and the needle's not really doing much when it's at wide open either). So, if you're chasing what seems to be a rich mid-range jetting problem and you have a old carb or a carb with a lot of hours on it, pull the slide out and look down into the needle jet and see if it's starting to oval. You'll see the ovaling on the engine side of the carb. - think egg shaped Most of the newer carbs, along with the higher performance older carbs, have replaceable needle jets, so if yours is looking worn, just go get a new one! You can also do more specific tuning with the needle and needle jet too - there are often options of needle tapers and needle jet diameters. It can get really deep if you're one of those racers that chases that last spec of hp. Want more, eh? Here's a great article (that I stole from dhjunkie) on what the parts of the carb are and what they do: This is from R&D Aerosports page and thought it might help those about what part does what in the carb. (Keep in mind, this was written about a particular carb - the sizes listed are not the only available - see local dealer for more) What Jet Does What? The Pilot System: The pilot or idler jet controls the air/fuel mixture mainly from closed to 1/4 throttle. Idler jet comes in sizes 35 to 60 at a 5 unit increments. The Throttle Valve: The round, flat, or oval cylinder (slide) that rides inside the main carb body is the throttle valve. This part is rarely changed in tuning and the same style is used on all Rotax engines. These valves do come in different cut-away configurations which changes the angle of the diagonally cut surface, but they are expensive to change and hard to find. If you need a leaner mixture you can file down the first taper, which increases the angle of the cut-away. This will lean out the mixture. The Needle Jet Circuit: This circuit is actually two toning pieces working in conjunction with each other. The Needle Jet is the cylindrical brass passage located directly above the main jet. This part is available in sizes 268, 270, 272, 274, 276, 278, and 280. The smaller the number, the smaller the diameter of the inner passage and the leaner the condition. The jet needle is the pin that rides inside the throttle valve and out the bottom of this slide into the needle jet passage. The Jet Needle: This part is available in 6H2, 802, 8G2, 8L2, 15K2, 11G2, 11K2, 15K2, and 15E5U. There may be a lot more available, but it's a well-kept secret, at least in this sport. A general rule of thumb to apply is, needles with a "High Number Code" produce richer mixtures above half-throttle. Example: 8L2 instead of 6L2. Needles with a "High Letter Code" produce richer mixtures below half-throttle. Example: 6P2 instead of 6D2. My recommendation is if you have a mid-range throttle problem, change the needle jet because this part will consistently affect the entire range from 1/4 to 3/4. Or you may want to experiment with your jet needle position. The Jet Needle Position: This position is determined by which location the holding plate is installed on the jet needle. This position affects the timing of the jet needle versus the throttle side and the needle jet. This relationship requires some thinking. It may require you to read this section several times, but once you understand what's going on, you can make educated changes rather than random experiments. Moving the holding clip to the top notch (position #1) will delay the timing between the jet needle and needle jet clearance versus the air intake supplied by the opening of the throttle valve. This will produce a leaner 1/4 to 3/4 throttle opening, because there will be more air passing into the engine than fuel allowed. Moving the holding clip to position #4 will accelerate the timing between the jet needle and the jet clearance versus the opening of the throttle valve. This will produce a richer mixture from 1/4 to 3/4-throttle opening. Don't expect miracles! While this change will make a difference, it may not cure your problem. A common complaint is that an engine will not operate at a given rpm. The engine will either drop or gain rpm without a throttle change. This gap can be as much as 1,000 rpm's and can often occur in the cruise range. Very annoying! A lot of people attach the holding plate position and then, in frustration, go after the needle jet/jet needle circuit. This condition, more often than not, is a result of the tuned exhaust system not wanting to hold that rpm. There is a chance that a mid-range modification may take care of this problem, but in many cases, you are stuck with it. The Main Jet: This part is easy to understand. It is simply a hole of an exacting size drilled in a hex-sided piece of brass. This passage controls all the fuel leaving the float bowl with the exception of the bypass circuits discussed previously. The main jet is available from 125 to 220 in 5-unit increments, with a few mid-sizes available, such as 146, 158, and 162. The smaller the number, the smaller the opening, and the leaner the condition. This part controls the fuel mixture mainly from 3/4 to full range. The majority of engine seizures and meltdowns occur in this 3/4 to full range. Leaning or richening the main jet will have a small effect on mid-range jetting. EGT: CAUTION! Most EGT gauges read slow, it is possible to seize an engine with exhaust temperatures as low as 800 degrees. It is advised to start with a rich mixture and only jet down if the exhaust temperatures are low after an extended period of time. We recommend 1050 degrees for climb out and not over 1150 degrees at cruise. And here is another: General All carburetors work under the basic principle of atmospheric pressure. Atmospheric pressure is a powerful force which exerts pressure on everything. It varies slightly but is generally considered to be 15 pounds per square inch (PSI). This means that atmospheric pressure is pressing on everything at 15 PSI. By varying the atmospheric pressure inside the engine and carburetor, we can change the pressure and make fuel and air flow. Air Flow Atmospheric pressure will force high pressure to low pressure. As the piston on a four-stroke engine goes down (or goes up on a two-stroke engine), a low pressure is formed inside the crankcase. This low pressure also causes a low pressure inside the carburetor. Since the pressure is higher outside the engine and carburetor, air will rush inside the carburetor and engine until the pressure is equalized. The moving air going through the carburetor will pick up fuel and mix with the air. Inside a carburetor is a venturi. The venturi is a restriction inside the carburetor that forces air to speed up to get through. A river that suddenly narrows can be used to illustrate what happens inside a carb. The water in the river speeds up as it gets near the narrowed shores and will get faster if the river narrows even more. The same thing happens inside the carburetor. The air that is speeding up will cause atmospheric pressure to drop inside the carburetor. The faster the air moves, the lower the pressure inside the carburetor. Circuits Working range for each carburetor partMost ATV carburetor circuits are governed by throttle position and not by engine speed. There are five main metering systems inside most ATV carburetors. These metering circuits overlap each other and they are: Pilot system Slide valve Jet needle and needle jet Main jet Choke system Pilot System The pilot system has two adjustable parts. The pilot air screw and pilot jet. Air Screw The air screw can be located either near the back side of the carburetor or near the front of the carburetor. If the screw is located near the back, it regulates how much air enters the circuit. If the screw is turned in, it reduces the amount of air and richens the mixture. If it is turned out, it opens the passage more and allows more air into the circuit which results in a lean mixture. If the screw is located near the front, it regulates fuel. The mixture will be leaner if it is screwed in and richer if screwed out. If the air screw has to be turned more than 2 turns out for best idling, the next larger size pilot jet will be needed. Pilot Jet The pilot jet is the part which supplies most of the fuel at low throttle openings. It has a small hole in it which restricts fuel flow though it. Both the pilot air screw and pilot jet affects carburetion from idle to around 1/4 throttle. Slide Valve The slide valve affects carburetion between 1/8 through 1/2 throttle. It especially affects it between 1/8 and 1/4 and has a lesser affect up to 1/2. The slides come in various sizes and the size is determined by how much is cutaway from the backside of it. The larger the cutaway, the leaner the mixture (since more air is allowed through it) and the smaller the cutaway, the richer the mixture will be. Slide valves have numbers on them that explains how much the cutaway is. If there is a 3 stamped into the slide, it has a 3.0mm cutaway, while a 1 will have a 1.0mm cutaway (which will be richer than a 3). Jet Needle and Needle Jet The jet needle and needle jet affects carburetion from 1/4 thru 3/4 throttle. Jet Needle Needle clip positionsThe jet needle is a long tapered rod that controls how much fuel can be drawn into the carburetor venturi. The thinner the taper, the richer the mixture. The thicker the taper, the leaner the mixture since the thicker taper will not allow as much fuel into the venturi as a leaner one. The tapers are designed very precisely to give different mixtures at different throttle openings. Jet needles have grooves cut into the top. A clip goes into one of these grooves and holds it from falling or moving from the slide. The clip position can be changed to make an engine run richer or leaner. If the engine needs to run leaner, the clip would be moved higher. This will drop the needle farther down into the needle jet and cause less fuel to flow past it. If the clip is lowered, the jet needle is raised and the mixture will be richer. Needle Jet The needle jet is where the jet needle slides into. Depending on the inside diameter of the needle jet, it will affect the jet needle. The needle jet and jet needle work together to control the fuel flow between the 1/8 through 3/4 range. Most of the tuning for this range is done to the jet needle, and not the needle jet. Main Jet The main jet controls fuel flow from 3/4 through full throttle. Once the throttle is opened far enough, the jet needle is pulled high enough out of the needle jet and the size of the hole in the main jet begins to regulate fuel flow. Main jets have different size holes in them and the bigger the hole, the more fuel that will flow (and the richer the mixture). The higher the number on the main jet, the more fuel that can flow through it and the richer the mixture. Choke System The choke system is used to start cold engines. Since the fuel in a cold engine is sticking to the cylinder walls due to condensation, the mixture is too lean for the engine to start. The choke system will add fuel to the engine to compensate for the fuel that is stuck to the cylinder walls. Once the engine is warmed up, condensation is not a problem, and the choke is not needed. Air/Fuel Mixture Air/fuel ratio for any given throttle positionThe air/fuel mixture must be changes to meet the demands of the needs of the engine. The ideal air/fuel ratio is 14.7 grams of air to 1 gram of fuel. This ideal ratio is only achieved for a very short period while the engine is running. Due to the incomplete vaporization of fuel at slow speeds or the additional fuel required at high speeds, the actual operational air/fuel ratio is usually richer. Troubleshooting Carburetor troubleshooting is simple once the basic principles are known. The first step is to find where the engine is running poorly. It must be remembered that carburetor jetting is determined by the throttle position, not engine speed. If the engine is having troubles at low rpm (idle to 1/4 throttle), the pilot system or slide valve is the likely problem. If the engine has problems between 1/4 and 3/4 throttle, the jet needle and needle jet (most likely the jet needle) is likely the problem. If the engine is running poorly at 3/4 to full throttle, the main jet is the likely problem. General Guide Guide to reading spark plugsClean the air filter and warm the bike up. Accelerate through the gears until the throttle is at full throttle (a slight uphill is the best place for this). If you hear pinging or if full throttle causes gasping and poor pulling at mid RPMs, this is a good sign that the engine is running lean. If the quad runs clean select a larger main jet until you find the jet that causes a blurbbing (four-cycling) sound. When you experience that sound, you have found the jet that causes the engine to run too rich. So back off one size to a smaller jet. This is the safe main jet to use. You could go another size leaner; but you need to be careful to avoid running too lean which causes the engine to run hot and could seize the piston. It's better to jet on the rich side. An alternate way to figuring out if you're too lean or rich is to examine the spark plug. After a few seconds of full throttle running, quickly pull in the clutch and stop the engine (Do not allow the engine to idle or coast to a stop). Remove the spark plug and look at its color. It should be a light tan color. If it's white, the air/fuel mixture is too lean and a bigger main jet will have to be installed. If it's black or dark brown, the air/fuel mixture is too rich and a smaller main jet will have to be installed. While changing jets, change them one size at a time, test run after each change, and look at the plug color after each run. After the main jet has been set, run the bike at half throttle. Any pinging means too lean. Blurbbing means too rich. Excessive smoking is also an indication of running too rich. As before, you can check the plug color. If it's white, lower the clip on the jet needle to richen the air/fuel mixture. If it's dark brown or black, raise the clip to lean the air/fuel mixture. Next go along slowly in one of the lower gears at less than 1/8 throttle and move the throttle quickly to 1/2 throttle. If the engine does not pull strongly. Sort of gasps for breath and only runs well after the RPMs build up, it is an indication that the needle is too lean. The pilot circuit can be adjusted while the bike is idling and then test run. Get the bike idling by adjusting the idle stop up where it will idle slowly on its own. Try to find the air screw adjustment where you get maximum idle RPM. If the screw is in the back of the carburetor, screwing it out will lean the mixture while screwing it in will richen it. If the adjustment screw is in the front of the carburetor, it will be the opposite. As the idle RPM increases turn down the idle stop to return the idle RPM to a slow correct idle. You objective is to find the pilot jet that will give you maximum idle with the air screw set at 1.5 turns out. If turning the screw between one and two and a half doesn't have any affect, the pilot jet will have to be replaced with either a larger or smaller one. While adjusting the pilot screw, turn it 1/4 turn at a time and test run the bike between adjustments. Adjust the pilot circuit until the ATV runs cleanly off of idle with no hesitations or bogs. Now when you find the correct pilot jet size you will want to do some final air screw adjusting to improve throttle response. Let the engine idle for 5 seconds then open the throttle abruptly and be aware of how the engine responds. If it almost dies, then you need a slightly richer idle mixture so that as that mixture is gulped at abrupt throttle openings it will be just a little rich and therefore give good response. You can test this as you ride say slowly in 2nd gear with the throttle closed so that the engine is drawing only from the pilot. Open the throttle quickly. If you find yourself doing a wheelie, your air correction screw is set right. If instead the quad slowly accelerates, then your idle mixture is probably too lean and you need to richen it up a little. Altitude, Humidity, and Air Temperature Once the jetting is set and the bike is running good, there are many factors that will change the performance of the engine. Altitude, air temperature, and humidity are big factors that will affect how an engine will run. Air density increases as air gets colder. This means that there are more oxygen molecules in the same space when the air is cold. When the temperature drops, the engine will run leaner and more fuel will have to be added to compensate. When the air temperature gets warmer, the engine will run richer and less fuel will be needed. An engine that is jetted at 32° F may run poorly when the temperature reaches 90° F. Altitude affects jetting since there are less air molecules as altitude increases. A quad that runs good at sea level will run rich at 10,000 ft due to the thinner air. Humidity is how much moister is in the air. As humidity increases, jetting will be richer. A bike that runs fine in the morning's dry air may run rich as the day goes on and the humidity increases.

-
Accident destul de grav - Mangalia - oct. 2010
topic a răspuns lui Manuel în one_crazy_bikerul Accidente
ma ,tot citesc si citesc ce scriu reisarii p-aci... io sunt endurist...crossist ..pamint frate...unii de aci ma stiu. si ii vad mereu pa pustii care se dau ,sa filmeaza pe curba aia...au in ei mers de uichend. in primul rind nu vedeti ca vine ca bubuitu in curba, nu taie si el curba oleaca,nu vine pe exteriorul soselei si cind intra in curba sa dea gaz si sa taie benzile pina pe mijlocul soselei.(asta in cazul in care vine cineva de pe contrasens ca daca nu o tai pina pe contrasens...si sa nu imi ziceti ca fura spatele banda dubla.)si cind a vazut pe partea de iesire din curba ca nu mai are loc folosesti si ultimul milimetru de asfalt sa iti revii). poi cum a venit el nu prea poti sa o iei cu viteza mare cu toate ca sensul din care a venit e cel mai bun pentru o abordare cu viteza mare Mangalia-2Mai(nu cum a zis cineva mai sus)...te pacalesti cind vii de la 2 Mai. ...si nici nu saluta sau sa raspunda la salut baietzii...e motociclisti dom'le. parerea mea. Mesaj completat Sustin! -
JOI seara am plecat din Mangalia catre CT cu treaba, la iesire din Mg era radar de care tocmai trecusem ca mi-a aparut in fatza un motor ,nu avea viteza mare.ii fac semn cu farurili si cam atit..intoarce...pe la Neptun ma depaseste,la 23 August era oprit ,la iesire iar ma depaseste si tot asa pina la Ct.mergea ca un incepator,intindea vitezele lung nu brusca gazu sau altceva..se vedea ca nu are experienta. acu aud asta ...poate nu conducea tot el. (mi-a sarit "in ochi" numarul NAS si carena fata alba)
-
Suzuki DR 600/650/ Big 750/800
topic a răspuns lui Manuel în sebi drul Totul despre motocicletele de enduro touring & adventure
Vad ca ai 600-tele. 1. cind vrei tu,la 3000,la 4000 sau cind incepe sa il manince,maxim la 6000. 2. 2,2 si cu filtru 2,45 la tine(600) 3. s-ar putea sa-i fi saracit oleaca amestecu,mai ridica o crestatura la cui dozaj pt sarcina si pt relantiu oleaca mai strins"aeru"da totusi sa nu mearga balbait ,reglajele le faci in limita bunului simtz sa nu meri inecat ,bujia iti zice. 4. s-ar putea sa trebuiasca sa stringi oleaca aeru asta daca baseste sau"pushca" exagerat in frina de motor,dar nu neaparat. -
Suzuki DR 600/650/ Big 750/800
topic a răspuns lui Manuel în sebi drul Totul despre motocicletele de enduro touring & adventure
Io banuiesc uzat contactu...nu mai tine 'stopu motor' din cdi la masa.cre k ai inteles ce ma scremui acilea. -
Suzuki DR 600/650/ Big 750/800
topic a răspuns lui Manuel în sebi drul Totul despre motocicletele de enduro touring & adventure
ĂŸi giubra mea e cu pedalĂĆ. numa' ca nu face cum zici tu sub nici o formĂĆ.ori au baieĂÂŁii ceva uzat sau defect ori au v'o modificare. -
Suzuki DR 600/650/ Big 750/800
topic a răspuns lui Manuel în sebi drul Totul despre motocicletele de enduro touring & adventure
stai,ca m-ai luat repede... adica daca lasi butonul rosu pe on fara sa bagi cheia in contact porneste? asta voiai sa zici?